Epoxy Paint for Garage Floors
Epoxy Paint for Garage Floors: Durable, Stylish, and Long-Lasting
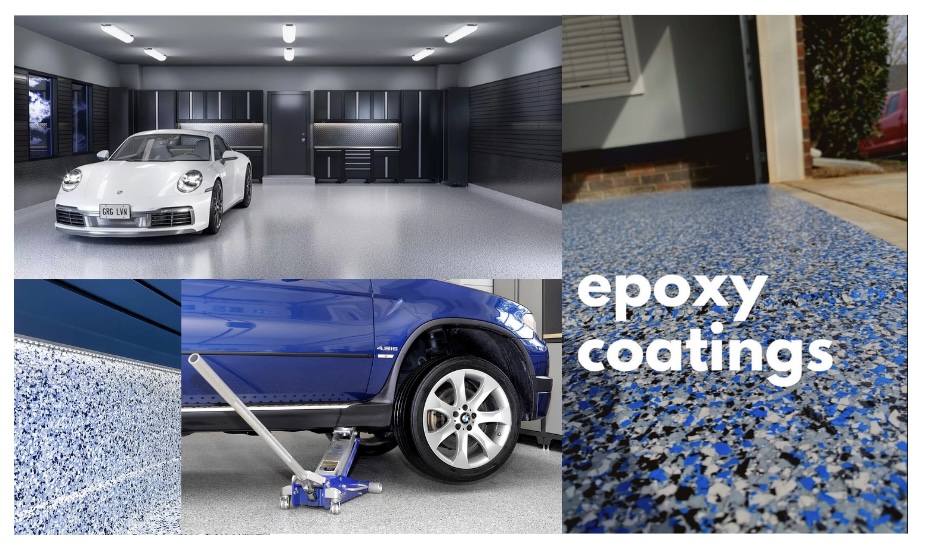
Garage floors take a beating from heavy vehicles, oil spills, and daily wear and tear. If you’re searching for a flooring solution that’s tough, easy to maintain, and visually appealing, epoxy paint for garage floors is the answer. This comprehensive guide explores why epoxy is the best choice for your garage, detailing its benefits, application process, and customization options.
What Is Epoxy Paint, and Why Is It Perfect for Garage Floors?
Epoxy is a high-performance polymer created by mixing resin and hardener, which triggers a curing process. The result? A durable, non-porous surface that can withstand heavy loads and extreme conditions, making it the ideal choice for garage floor coatings. Its seamless finish not only enhances your garage’s aesthetics but also ensures easy cleaning and superior protection.
Key Benefits of Epoxy Paint for Garage Floors
1. Unmatched Durability
• Designed to handle vehicle weight, foot traffic, and heavy equipment.
• Resistant to cracking, peeling, and chipping under pressure.
2. Chemical Resistance
• Protects against oil, gasoline, antifreeze, and other automotive fluids.
3. Easy Maintenance
• Non-porous surface repels dirt and stains, making cleanup quick and hassle-free.
4. Aesthetic Appeal
• Available in a wide range of colors, patterns, and finishes.
• Creates a glossy, polished look that transforms your garage into a showroom.
5. Safety Features
• Can include anti-slip additives for enhanced safety.
6. Long-Lasting Investment
• Extends the lifespan of your concrete floor by protecting it from wear and tear.
How Epoxy Paint Works: The Science Behind Its Strength
Epoxy is a polymer comprised of two components typically called resin and hardener, mixed into specific ratios. When resin and the curing agent (hardener) are combined, a chemical reaction happens and it creates a durable material. Epoxy’s superior performance comes from its cross-linked polymer structure, formed during curing. This provides:
• Hardness: A tough surface resistant to impact and abrasion.
• Adhesion: A strong bond with concrete, preventing peeling or bubbling.
• Flexibility: Accommodates minor floor movement without cracking.
How to Apply Epoxy Paint to Garage Floors
For a flawless epoxy garage floor, follow these steps:
1. Surface Preparation
Here’s How to Prepare Your Garage Floor for Epoxy Coating Like a Pro:
Step 1: Remove Everything From the Garage Floor
Start by emptying the entire garage. This includes tools, vehicles, workbenches, cabinets, and any other items on the floor. Ensure that the floor is completely clear to give you a blank canvas for the next steps.
Step 2: Address Sinking Concrete
Inspect your garage floor for any areas that have sunk or settled. If you notice uneven spots, you’ll need to level the concrete before applying epoxy. Use a concrete leveling product to lift and stabilize the floor, ensuring a smooth surface for the epoxy.
Step 3: Clean the Garage Floor Thoroughly
A clean floor is essential for epoxy adhesion. Sweep away dust and dirt, then use degreasers to remove any oil or chemical stains. Mop the floor with a soap and water mixture, rinse thoroughly, and let it dry completely.
Step 4: Protect the Walls
Before you rough up the concrete, protect your walls and any areas you don’t want to get dusty. Use tape and plastic sheets to cover walls, windows, shelves, and other items.
Step 5: Rough Up the Concrete Surface
Epoxy adheres best to a rough surface. You can achieve this by grinding the floor or using an acid etching solution.
•Concrete Grinding: Use a hand grinder with a suitable plate to sand down the concrete in circular motions, ensuring an even, rough surface without gouges.
•Acid Etching: Apply an acid etching product according to the manufacturer’s instructions. This method can be tricky and requires careful handling to avoid inconsistent results and health hazards.
Step 6: Fill Any Cracks
After roughing up the floor, fill any cracks with an epoxy concrete crack filler. Follow the product instructions for the best results.
Step 7: Final Rinse and Drying
Rinse the floor once more to remove any remaining dust or debris. Allow the concrete to dry completely before applying the epoxy to ensure a strong bond.
Your Next Steps
Prepping your garage floor may seem extensive, but it’s crucial for a successful epoxy coating. A well-prepared surface ensures the epoxy adheres properly, providing a durable and attractive finish that lasts for years.
If you have uneven or sinking garage floors, look for professional services, which offers concrete levelling and crack repair to get your floor ready for epoxy application.
2. Priming the Floor
• Apply a primer to enhance adhesion and durability.
3. Mixing Epoxy
• Combine resin and hardener according to the instructions. Work quickly, as curing starts immediately.
4. Application
• Pour and spread the epoxy evenly using a roller or squeegee.
• For a customized look, add decorative flakes during this step.
5. Curing and Finishing
• Allow the epoxy to cure for the recommended time.
• Apply a topcoat for additional protection and shine.
TIPS:
Allow new concrete to cure a minimum of 28 days.
Apply when temperature range is 60 to 85 degrees.
Wait 24 hours after coating for light foot traffic.
Wait 3 days after coating for vehicle traffic.
Conduct a moisture test before applying coating:
Apply 2×2 sheet of plastic to concrete taping edges down. Wait 72 hours and check for water droplets or evidence of moisture. Wait 72 hours and test again.
ALWAYS FOLLOW MANUFACTURER’S MIXING INSTRUCTIONS.
Customization Options for Your Garage Floor
Personalize your epoxy floor with:
• Metallic Finishes: Achieve a sleek, modern appearance.
• Color Flakes: Add texture and a decorative touch.
• Matte, Satin or Glossy Topcoats: Choose your preferred level of shine.
Maintaining Epoxy Garage Floors
To keep your epoxy floor in top condition:
• Clean spills promptly to prevent staining.
• Sweep and mop regularly to remove dirt and debris.
• Avoid dragging heavy objects to prevent scratches.
Conclusion: Why Epoxy Paint Is the Best Choice for Garage Floors
Epoxy paint for garage floors is an investment in durability, aesthetics, and ease of maintenance. Its unparalleled performance, chemical resistance, and customizability make it the ultimate flooring solution for garages.
If you’re ready to upgrade your garage with a sleek, durable epoxy floor, we’re here to help. Whether you need guidance in choosing a trusted contractor or finding the perfect DIY product, our experts are here to simplify the process and ensure stunning results.